Sony 7 R II e flash per fotografi di matrimonio

Non si sono ancora spenti gli echi del nuovo annuncio della Sony 9 che vi propongo un articolo per tutti i fotografi di matrimonio che si accingono ad utilizzare la 7 R II con il flash ai matrimoni.

La macchina, è pieno di recensioni on line, è strepitosa, i file ottimi e un AF continuo da far impallidire Canon e Nikon le ottiche sono superbe ma se la usate per eventi e matrimoni prima o poi vi scontrerete con un suo limite: la fotografia con il flash in totale assenza di luce… L’autofocus anche quello singolo con l’illuminatore AF incorporato è un po’ lento e fra il premere il pulsante e lo scatto c’è un ritardo un po’ troppo lungo anche con il flash F60M, inoltre non supporta l’illuminatore infrarosso del flash.

Ho quindi optato per una soluzione “old school” degna degli albori della fotografia: il fuoco zonale con il flash in manuale.
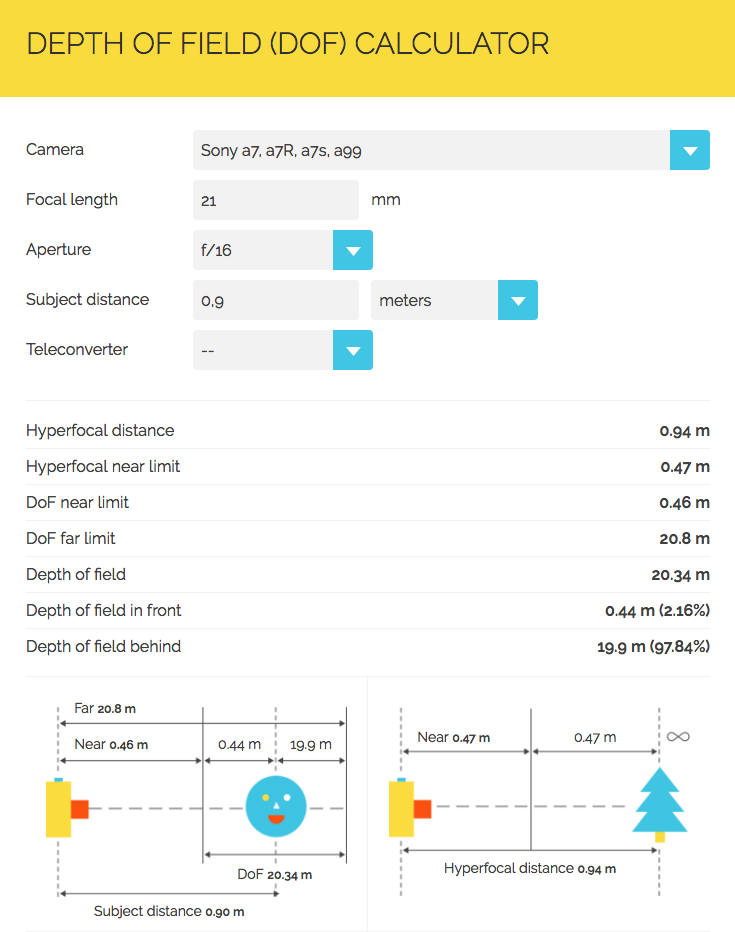
Sono partito dal fatto che la mia Sony 7 R II + 28mm f 2,0 + Wide Converter = 21 mm f 2,8 che chiuso a f 16 mi  e focheggiata in manuale a 0,9 metri dà una Profondità di campo di oltre 20 metri da 0,46 a 20,34 (per i calcoli ho usato PhotoPills )

sony flash

sony flash

Quindi vi riepilogo i mie settaggi per la macchina e per il flash (io uso un piccolo Nissin i40 compatto e potente):

SONY 7 R II
Programma: Manuale
Diaframma: 16
Tempo: 1/60 ( con tempi e ISO si può giocare un po’ a seconda dell’effetto che volete dare)
ISO: 800
Messa a fuoco manuale a 0,90 metri
View Finder settato con gli effetti OFF in modo da vedere quello che inquadrate

Flash Nissin i40
In manuale a 1/8 di potenza

In questa maniera si deve solo inquadrare e scattare senza più paura di avere foto sfocate… Buon divertimento.

CONTATTAMI

Fotografo Lago di Como – Fotografo Bergamo – Fotografo Pavia – Fotografo Monza

Archive Workflow for Wedding Photographers with Sony 7 R II

There is a new beast in the house the Sony 7 R II. After working for more than 4 years with mirrorless camera in to the wedding industry I start to desire a bigger sensor. Micro 43 (MFT) is great, nice lenses, nice cameras, fast AF and great depth of field. At the end I started with 35mm analogue cameras more than 25 years ago and sometimes I really want  something more dreaming for my images so I started to evaluate a new full frame camera. At the end only two remains the great Nikon D750 and the Sony 7 R II. Nikon has two slots, a super battery life and a lot of lenses… And it costs half the price of Sony… Mirorless is, for me, a non returning path… I bought the Sony not because is superior but because I can take it with me every day in my little bag, Nikon and Sony are different cameras, not comparable… So I discovered that I will use it also for my everyday shooting.
In future articles I will cover AF and I will share pictures in a real wedding shooting, right now I’m playing with the camera to become more confident…
As you know 42 megapixel are probably more than a wedding photographer will need and doing a little bit of math shooting more or less 2.000 files for every wedding I will need a lot of space for my archive 2.000×43 megabyte = 86 gigabyte for every wedding x 12 weddings every year it’s about 1 Terabyte… A little bit too much also the files are huge and they will slow down your everyday workflow with Lightroom… Time for me is money so I started to consider if I can do something better… Without loosing the amazing low light quality (I can shoot wedding easily up to 12800  and I’m evaluating 25.600).

My actual wedding workflow with my MFT cameras is pretty quick: 1) Download on my Archive and rename (raid); 2) Transform to DNG without compression; 3) Rating; 4) Post Processing; 5) Gallery on line; 6) Send to clients; 7) Wedding Album; 8) Close the project;  9) Archive also on line.

I started to think to change it  in this way: 1) Download on my Archive, and rename with a temporary name (raid); 2) Convert to DNG ( I will not convert anymore to DNG next time, I will export direct from Raw files); 3)Export new DNG files with final Names at 24 MegaPixel with compression import them to LG; 4) delete temporary DNG  files; 5) Rating; 6)Post Processing; 7) Gallery on line; 8) Send to clients; 9) Wedding Album; 10) Close the project;  11) Archive also on line.

LG_01

I was a little bit scared when I saw that the 24 Megapixel DNG compressed files was only from 6 to 18 mega of weight….
A great loss from an huge 43 (40–50). Great for Archiving great for speed but and what a “but” what about the quality? What about low light?

I was playing with a Voigtlander 35mm f 1.4 in a very low light environment… (you will also have a link to download of two DNG files) I was astonished by the quality of the DNG compressed files the size was from 50 to 17 mega but the quality at 12.800 ISO really in a dark room was unbelievable.

Here is a screen shot at 100%

LG_02


Here you can download the 2 DNG files Compressed and Uncompressed: Download
I will do some more tests but I’m quite confident that I will used 24 Megapixel files
This workflow will save me a lot of time during post processing. Also my MFT preset wok better in Lightroom with smaller files…
The wedding season will start in few days…
Before I will be in Africa for a 3 weeks mission for my Editorial Work…
I will use the sony also for some video shooting.

Stay tuned… 🙂

CONTATTAMI

Fotografo Lago di Como – Fotografo Bergamo – Fotografo Pavia – Fotografo Monza